Friday, July 24, 2009
Happily Ever After
I was so happy when I had finally finished the last page. It is that huge weight lifted off your shoulders feeling and sense of accomplishment. It is a simple layout, since there was only one picture. I knew I also wanted to use my Once Upon a Time stamp set and also the Beautiful Butterflies Die.
 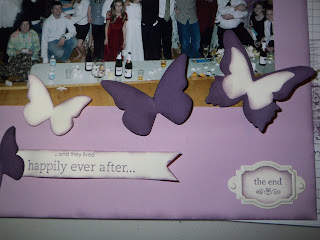 I added sponging to the butterflies and I also added some Hardware from the Very Vanilla Hodgepodge Hardware. Hint: There are punches that are designed to coordinate with the hardware. I used the Designer Label punch with this one.
Thursday, July 23, 2009
The Last Two Page Layout for the Wedding Album
So I have one more page to show you after this layout and then there is the cover of the book after that. This has got to be one of my most favorite layouts yet. I am really happy with the way it turned out. I like that I was able to incorporate lots of photos and still add interest.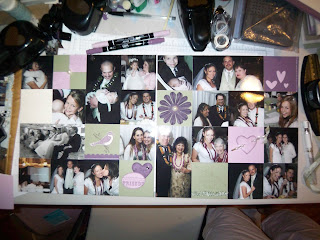 When I was mapping out this layout, I figured I wanted 4 accent squares on each page and I wanted them all on different squares, so that the pages wouldn't mirror each other. I waited to glue everything down until I had the exact layout I wanted.
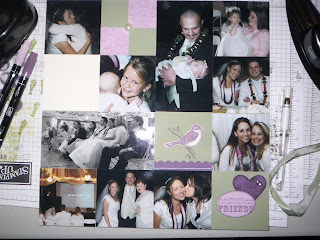 The vanilla square looks like it is plain with nothing on it, but if you click on the photo you can probably see that there are hearts punched out and glued on top to create a tone on tone effect.
 Hint: Punches help to create quick and easy accents. Add a stamp and some accessories to jazz it up!
 All the accessories used on these pages came from the pretties kit. Hint: You can coordinate the pretties kit with all the Stampin' Up! Colors. You can color the flowers with the Stampin' Write Markers or use reinkers and a little bit of water. You can even match the In-Colors for this year, they just came out with In-Color Stampin' Write Markers. Yeah!
Stamp Sets: Friends 24-7, Stem Sayings
Paper: Pale Plum, Perfect Plum, Mellow Moss, Very Vanilla
Ink: Pale Plum, Perfect Plum, Mellow Moss
Accessories: Pretties Kit, Wide Oval Punch, Full Heart Punch, Heart to Heart Punch, Scallop Edge Punch, Mat Pack, Mellow Moss Taffeta Ribbon, Signo White Gel Pen
Wednesday, July 22, 2009
Seeing Spots Scrap Book Page
When I was trying to figure out this next layout I was very overwhelmed with how many pictures there were. I didn't know where to start. I was also looking for a quick way to put this page layout together. Anyway, long story short, I had my largest circle punch out on the table and started playing around and this is what I came up with.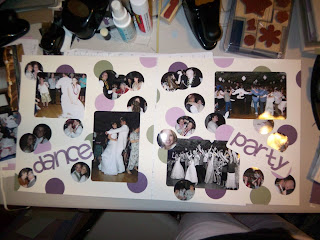 I added circle of colored card stock to add some more interest. Hint: Many of the circles are only partly showing. If you know that only part will show, you can cut off the part that will be hidden and use the spare piece for the edges of the paper, to give it a continuous look.
  I also had some pictures that were larger and wouldn't fit within one circle punch. So I figured out a way to kind of extend the picture and also add some special interest to the pictures.
Monday, July 20, 2009
Tulipe Scrap Book Layout
This is the next layout for the Wedding Album. I liked it a lot better once it was all put together. There are some fun details that I really like on these pages. When I was originally putting this layout together I was going to have the lines uniform on the bottom of the page. It was by accident that they were put off center. I like to say it was a happy accident, because I like how it turned out. Tip: Not all accidents are bad, embrace human error, you never know, you may end up loving it!  Another thing that was unexpected is I found a scrap of paper with the tulipe already cut out of it, I thought that it would make a great stencil for an accent. Hint: You can create your own stencils using Stampin' Up! window sheets. Use your Big Shot dies with the window sheets and you can make stencils that you can clean, and reuse over and over.
 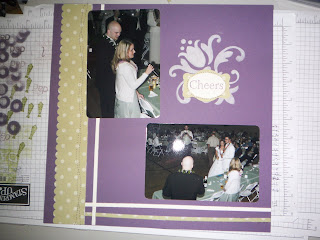 I pulled out my sewing machine for these pages, I am so glad I did because that is my favorite part about the pages. I ran two wavy lines of stitching up and down the dotted paper.
 I added a fun little bouquet on this page for the garter and bouquet toss.
 I used my favorite paper snips from Stampin' Up! to cut out this image. Hint: They are great for getting into small spaces to get rid of that unwanted card stock.
Supplies:
Stamp Sets: Friends 24-7, The Snowflake Spot (retired)
Paper: Perfect Plum, Very Vanilla, Retired DSP
Ink: Very Vanilla, Perfect Plum
Accessories: Tulipe Bigz Die, Wide Oval Punch, 1-3/4" Circle Punch, Lovely Label Punch, Corner Rounder Punch, Mellow Moss Taffeta Ribbon, Sponge Dauber, Sewing Machine and thread
Monday, July 13, 2009
Would you believe?
I have finished my Brother and Sister-in-law's Wedding scrap book. Hallelujah!! This is not the last page, I will post the rest of pages over the next few days. I actually finished the album before I went to Hawaii. It was a huge relief to me and also my Bro and SIL I'm sure.  Here is the layout all together. I used Perfect Plum, Pale Plum, and Very Vanilla for this layout.
  To do the title I used the Stampin' Up! Billboard decorative strip die.
Hint: When adhering the little letters I have found that Tombow Multi Purpose Adhesive works the best with its small glue tip. Also if you don't want to get your fingers messy, try applying the glue with a toothpick.

I created the background of these pages using the Kind Thoughts Brocade decor stencil, Perfect Plum ink, and a sponge dauber.
Hint: To keep track of what dauber belongs to which ink, simply put the name of the color on a piece of masking tape and place on the side of the dauber. You will never wonder if it is rose red, ruby red or real red again.
 To add something more to the title, I selected different sections of the same stencil, and added some swirly accents.
Supplies:
Paper: Pale Plum, Perfect Plum, Very Vanilla
Ink: Perfect Plum
Accessories: Billboard Decorative Strip Die, Kind Thoughts Brocade decor stencil, Sponge Dauber, Cutter Kit
Hint: When adhering the little letters I have found that Tombow Multi Purpose Adhesive works the best with its small glue tip. Also if you don't want to get your fingers messy, try applying the glue with a toothpick.
I created the background of these pages using the Kind Thoughts Brocade decor stencil, Perfect Plum ink, and a sponge dauber.
Hint: To keep track of what dauber belongs to which ink, simply put the name of the color on a piece of masking tape and place on the side of the dauber. You will never wonder if it is rose red, ruby red or real red again.
Supplies:
Paper: Pale Plum, Perfect Plum, Very Vanilla
Ink: Perfect Plum
Accessories: Billboard Decorative Strip Die, Kind Thoughts Brocade decor stencil, Sponge Dauber, Cutter Kit
Thursday, July 9, 2009
I'm Back from Hawaii
I just wanted to show you the remaining cards we made for Ladies' Night Last month. This card is great if you have a lot of scraps that need to be used up.
Hint: I used my SU! square punch to punch out all the paper to make sure they were all the same size and fit perfectly together. I glued them onto a piece of white card stock (it really could be any color since you don't see it) and rolled it through my big shot.
 I used some paper from Sale-A-Bration, because I had lots of scraps that I could use.
Hint: Stampin' Up! has great packs of designer paper that coordinate with each other.
Hint: I used my SU! square punch to punch out all the paper to make sure they were all the same size and fit perfectly together. I glued them onto a piece of white card stock (it really could be any color since you don't see it) and rolled it through my big shot.
Hint: Stampin' Up! has great packs of designer paper that coordinate with each other.
Stamps: Say it With Scallops (retired)
Paper: Darling Dots DSP (retired), Naturals Ivory, Whisper White
Ink: Sahara Sand
Accessories: Certainly Celery Poly Twill Ribbon (retired), Scallop Square Punch, Top Note Die
I love the look of the next card, it is so sleek and simple. It is amazing how a little embossing can transform a card.
Hint: I used white embossing powder to create this image. If you want the image to pop, then use a dark Designer Paper or card stock with the white embossing powder. If you want a subtle image you could use clear embossing powder. Also make sure you use your embossing buddy on your paper before you stamp your image in VersaMark, you'll be sure to get a crisp image this way.
Hint: Stampin' Up! has a Cutter Kit that has a distressing tool and other cool cutting tools.
To finish off the card I added a fun clip with some scrap ribbon attached.
Stamp Sets: Upsy Daisy
Paper: Kiwi Kiss, Whisper White, Urban Garden DSP (Retired)
Ink: VersaMark, Basic Grey
Accessories: Clips Assortment, Kiwi Kiss Satin Ribbon (Retired), White Embossing Powder
Subscribe to:
Posts (Atom)